
STORE LOCATOR
LOOKIN' FOR
HAPPY EGGSNEAR YOU?
Enter your zip code to find Happy Egg in your neck of the woods.

Read more happy
the ultimate dad-approved grilling playlist
the ultimate guide to hard-boiled eggs

songs to queue at your next garden party
Whether you’re meal-prepping like a boss, whipping up a quick snack, or fancying up your avocado toast, hard-boiled eggs always get the job done. But let’s be real—nailing the perfect hard-boiled egg can feel trickier than it should. Rubber yolks? Cracked shells? Been there.
Luckily, we’ve got your back with this easy, foolproof guide to hard-boiled eggs. In this guide, we’ll break down everything from general tips and cooking times to recipe inspo that’ll make you feel like a pro in the kitchen.
Spoiler alert: it all starts with using the best eggs (hint: Happy Egg) for that tasty, orange yolk and incredible flavor.
General Tips for the Best Hard-Boiled Eggs
Before we dive into hard-boiled egg timing, recipe ideas, and peeling hacks, let’s start with the basics with these tried and true tips for the best hard-boiled eggs:
1. Start Cold, Finish Hot
Pop your eggs into a pot of cold water before turning up the heat. Why? Because no one likes a sudden temperature shock—not even eggs. Pro tip: make sure the water covers the eggs by about an inch for best results.
2. Always Use a Slotted Spoon
When placing your eggs in the pot, use a slotted spoon to lower them gently into the water. This is the easiest way to prevent cracked eggs.
3. Boil Together for Even Cooking
Bring the eggs and water to a boil together. This ensures even cooking throughout the egg. Starting with boiling water can leave you with a rubbery texture or uneven yolks - and nobody wants that.
4. Don’t Crowd the Pot
Eggs need their personal space, too. Give them some room to breathe (and cook evenly). Overcrowding = cracked shells and inconsistent cooking, and we’re not here for that energy.
5. Add a Dash of Salt or Vinegar
Toss a pinch of salt or a splash of vinegar into the water. Not only does this help seal up tiny cracks, but it also makes peeling those eggs so much easier later.
6. Not sure if that egg in the fridge is boiled or raw?
Try the spin test! Spin the egg on the counter—if it wobbles, it’s raw; if it spins smoothly, it’s boiled. It’s a foolproof trick for avoiding messy surprises.
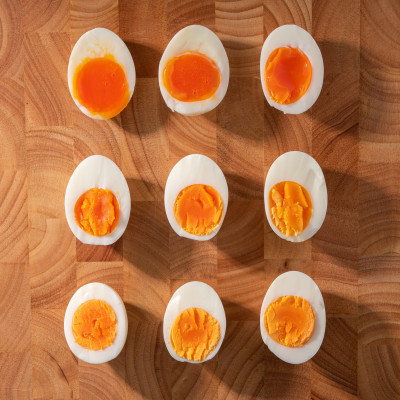
Timing (and Recipes) for Every Type of Boiled Egg
Soft-Boiled Eggs (6-7 Minutes)
-
Yolks: Jammy and slightly runny, perfect for dipping.
-
Recipe Idea: Soft-boiled eggs are made for salads. Slice them in half and let that orange yolk melt over your leafy greens.
Medium-Boiled Eggs (8-9 Minutes)
-
Yolks: Custardy and creamy, just firm enough to hold their shape.
-
Recipe Idea: Medium-boiled eggs make the best egg salad sandwiches. The custardy, creamy yolk is oh-so-good on a fluffy bread.
Hard-Boiled Eggs (10-12 Minutes)
-
Yolks: Fully set, but still tender and creamy.
-
Recipe Idea: Hard-boiled eggs are perfect for classics like deviled eggs. Pro tip: chop them up and sprinkle on avocado toast for an easy, protein-packed breakfast.
The Ice Bath Trick
As soon as your eggs are done, scoop them out with a slotted spoon and plunge them into an ice bath (just a simple bowl of water filled with ice). This stops the cooking process and helps prevent that dreaded green ring around the yolk. Plus, it makes peeling the hard-boiled eggs easy-peasy.
Speaking of Easy Peeling…
Peeling hard-boiled eggs can be...well, a process, but it doesn't have to be.
For stress-free peeling, use these hacks:
-
Use eggs that are a few days old—fresh eggs tend to stick to the shell.
-
Tap the egg on a hard surface and roll it gently to crack the shell all over. Then peel under running water to loosen the shell further.
Check out our guide: How to Peel Hard-Boiled Eggs for even more tricks for peeling hard-boiled eggs.
Ways to Use Boiled Eggs
From grab-and-go snacks to protein-packed meal-prepping recipes, boiled eggs can do it all!
Not sure where to start? Check out our list of ideas for The Best Ways to Use Boiled Eggs.
Storing Hard-Boiled Eggs
Hard-boiled eggs are a busy family’s best friend—quick, easy, and ready to save the day when someone wants a quick, healthy snack. Store them in the fridge in an airtight container, and they’ll stay fresh for up to a week.
Pro-tip for those jam-packed mornings: keep the shells on until you’re ready to eat. It helps them stay fresher longer and cuts down on prep time when you need a grab-and-go snack or a fast addition to lunchboxes.